Airaid 520-284 User Manual
Browse online or download User Manual for Air equipment Airaid 520-284. Airaid 520-284 User Manual
- Page / 2
- Table of contents
- BOOKMARKS
Rated. / 5. Based on customer reviews
Installation Instructions
For Part Numbers:
520-284 720-476 Airaid Oiled Media Filter
521-284 721-476 SynthaMax Dry Media Filter - Red
522-284 722-476 SynthaMax Dry Media Filter - Black
523-284 723-476 SynthaMax Dry Media Filter - Blue
2004-14 Nissan Titan / Armada
2004-10 Infiniti QX56
5.6L V8
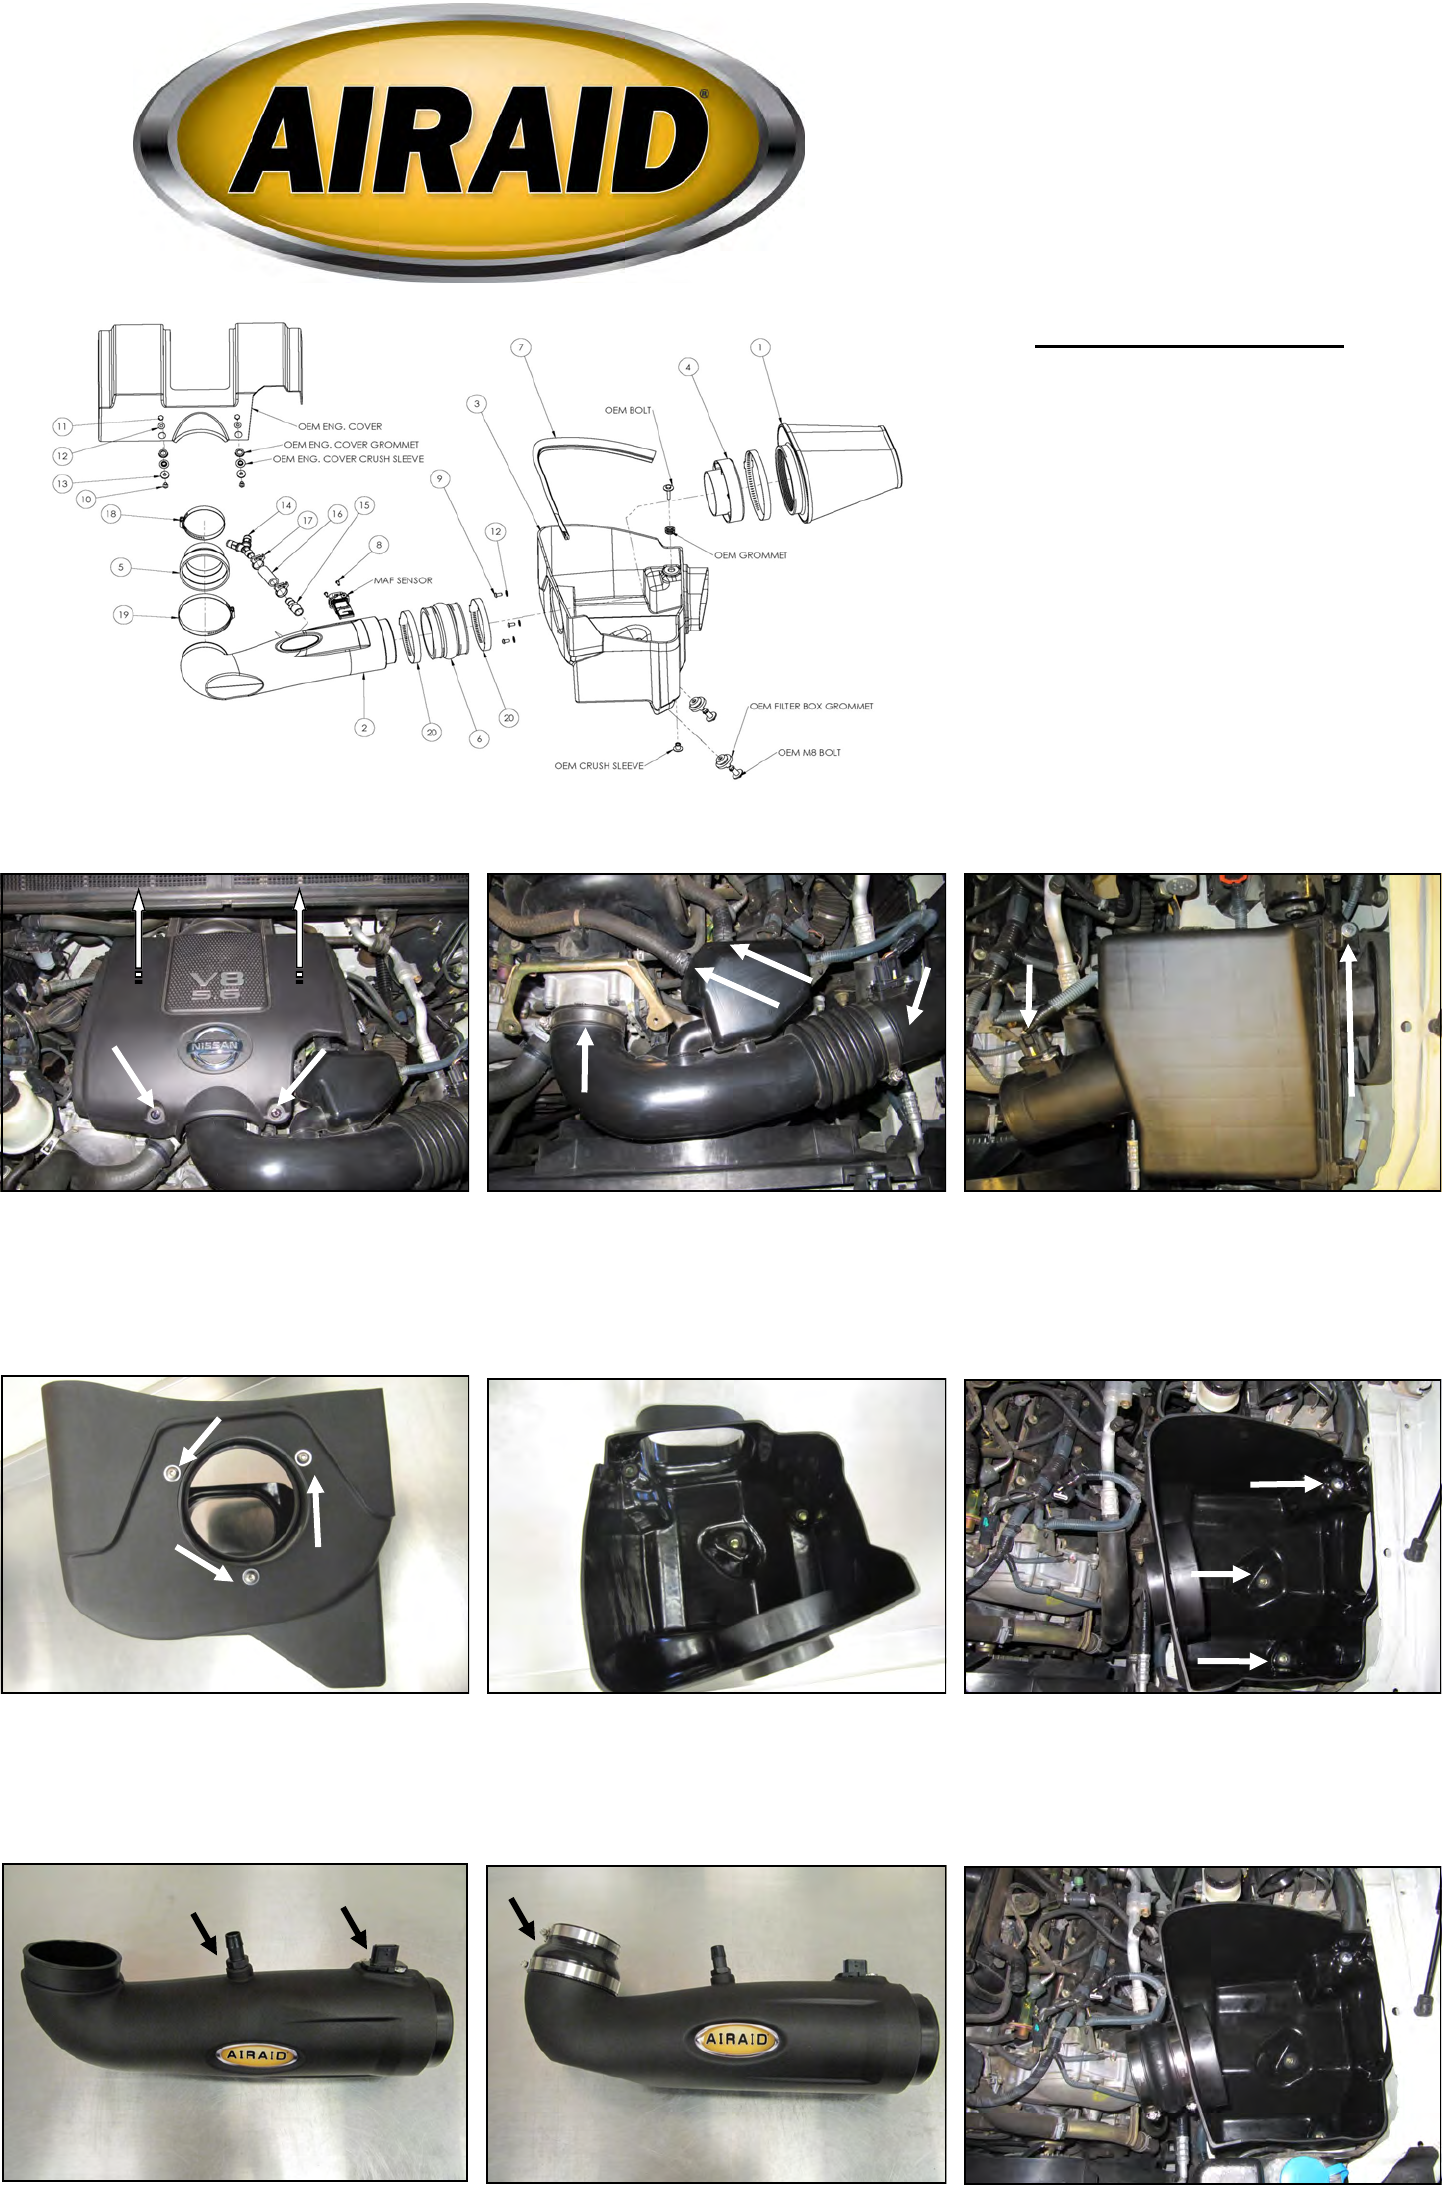
2. A.) Using a pair of pliers, compress the spring
clamps on the PCV breathers and them slide back. Dis-
connect the breathers from the factory intake
B.) Loosen the two clamps on the factory intake tube
and remove it from the vehicle.
3. Disconnect the Mass Air Flow sensor, or MAF, and
separate the wiring harness from the airbox lid. Using a
10mm socket, remove the single bolt securing the airbox.
Lift straight up on the airbox assembly and unseat it from
the mounting grommets on the inner fender. 4WD models
will need the differential breather disconnected from the
airbox lid.
4. Install the Filter Adapter (#4) onto the Cold Air Box
(#3), or CAB , as shown using three 1/4-20 Button Head
Bolts (#9), and 1/4” Flat Washers (#12). Refer to the
line drawing above for details.
5. Transfer the airbox mounting grommets and hard-
ware from step 3. into the Cold Air Box. A.) Insert the
large mounting grommets and bolts from the inner
fender into the bottom of the CAB. B.) Remove the
small grommet and steel sleeve from the top of the air-
box and install it remaining hole in the CAB.
6. Set the CAB assembly inside the engine compartment,
align the bolt holes, and secure using the OEM hardware.
8. Slip the Silicone Reducer (#5) onto the Intake Tube
as shown. Slide the #64 Clamp (#19) onto the Reducer
first, followed by the #48 Clamp (#18). Leave the
Clamps loose for now.
7. Install the threaded 5/8” Barbed Fitting (#15) into the
Airaid Intake Tube (#2). Transfer the Mass Air Flow
sensor from the factory airbox, into the Airaid Intake
Tube and secure using the two 8-32 Button Head
Screws. Do not attempt to reuse the factory screws.
9. Slide the Hump Hose (#6) and #72 Hose Clamps (#20)
onto the Filter Adapter. Leave the clamps loose for now.
Component Identification
1. Airaid Premium Filter 1
2. Air Intake Tube 1
3. Cold Air Box 1
4. Filter Adapter 1
5. Silicone Reducer 1
6. Urethane Hump Hose 1
7. 23” Weather strip 1
8. #8-32 x ½”Button Head Screw 2
9. ¼-20 x ½” Button Head Screw 3
10. M6x1.0x30Hex Head Bolt 2
11. M6x1.0 Acorn Nut 2
12. 1/4” Flat Washer 5
13. Spacer 2
14. 5/8 Barbed Y Fitting 1
15. ½ NPT to 5/8” Barbed Fitting 1
16. 2 1/2” 5/8” Hose 1
17. #19 Speed Clamp 2
18. #48 Hose Clamp 1
19. #64 Hose Clamp 1
20. #72 Hose Clamp 2
21. 8” Zip Tie 1
Disconnect The Negative Battery Terminal!
1. Using a 10mm socket, remove the two front engine
cover bolts. Lift straight up on the cover and unseat the
rear half from it’s mounting grommets.
MAF
A
B
Full color instructions can be viewed on our web site at Airaid.com. Use the Product Search function to find your part number, and click View Details.
1
2
Summary of Contents
Page 1 - Installation Instructions
Installation Instructions For Part Numbers: 520-284 720-476 Airaid Oiled Media Filter 521-284 721-476 SynthaMax Dry Media Filter - Red 522-284 722
Page 2 - Filter Tune-Up Kit!
Airaid Filter Co. 2688 E Rose Garden Ln. Phoenix AZ 85050 (800) 498-6951 [email protected] www.airaid.com P/N 790-551 Aerosol Spray P/N 790-5
Related products and manuals for Air equipment Airaid 520-284
Air equipment Airaid 883-275 User Manual
 (7 pages)
(7 pages)
Air equipment Airaid 883-300 User Manual
(4 pages)
(4 pages)
Air equipment Airaid 883-282 User Manual
(7 pages)
(7 pages)
Air equipment Airaid 883-306 User Manual
(3 pages)
(3 pages)
Air equipment Airaid 883-290 User Manual
(5 pages)
(5 pages)
Air equipment Airaid 883-305 User Manual
(3 pages)
(3 pages)
Air equipment Airaid 883-314 User Manual
(5 pages)
(5 pages)
Air equipment Airaid 883-315 User Manual
(6 pages)
(6 pages)
Air equipment Airaid 200-996 User Manual
(2 pages)
(2 pages)
Air equipment Airaid 250-992 User Manual
(2 pages)
(2 pages)
Air equipment Airaid 250-927 User Manual
(2 pages)
(2 pages)
Air equipment Airaid 310-970 User Manual
(4 pages)
(4 pages)
Air equipment Airaid 300-944 User Manual
(4 pages)
(4 pages)
Air equipment Airaid 450-974 User Manual
(2 pages)
(2 pages)
© 2020, manymanuals.com. All rights reserved. | 3.707 s |
 Manymanuals.com
 Manymanuals.de
 Manymanuals.fr
 Manymanuals.it
 Manymanuals.pl
 Manymanuals.cz
 Manymanuals.es
 Manymanuals-pt.com
Comments to this Manuals